

How To Install Bitbucket Plugin In Jenkins
Jenkins is an open source automation server, which will help you to automate the application deployment in your infrastructure.
From Jenkins, for deployment, you lot can connect to whatsoever kind of source lawmaking control system, and pull the source, build it, and deploy information technology automatically to 1 or more than servers.
In this tutorial, we'll explain how you tin create a new Jenkins Job, and connect it to a Git repository to pull the source code for building.
Install Jenkins Git Plugin
For this, you should have "Git Plugin" installed in your Jenkins.
Login to Jenkins UI using your admin business relationship, and go to "Manage Jenkins" -> Manage Plugins -> Click on "Installed" Tab -> From hither, search for "git plugin" in the filter.
If the "Git plugin" is already installed, it will brandish it hither as shown beneath.
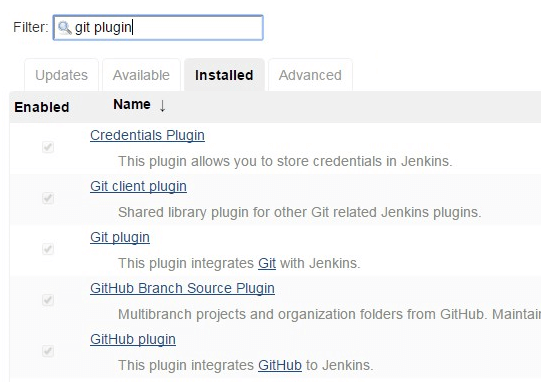
During Jenkins installation, if yous've chosen to install the "recommended plugin", you lot'll already have "git plugin" as shown higher up.
If you don't see information technology, then install information technology. Go to "Available" tab, search for "git plugin", and click on "Install without restart".
From your plugins listing, if you run across that "Git Plugin" is an older version, then upgrade it to the latest version as explained here: How to Upgrade Jenkins to New Version and Update Plugins
Create New Jenkins Job
Click on "New" to create a new jenkins job. Select "Free Style Project" equally type as shown below. Name: Dev App Build. Blazon: Gratuitous Style Project
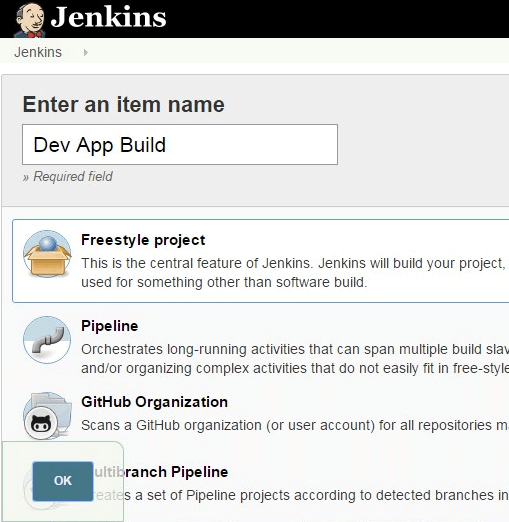
By default this will become into editing the job after creating it. In the edit way, you'll see multiple tabs on the tiptop, and "General" tab volition be selected.
Select "Git" for Source Code Management
For this particular job, click on "Source Code Management" tab. This will have the following options:
- None (This option will be selected by default).
- CVS
- CVS Projectset
- Git
- Subversion
Click on "Git" to select it. This will expand the section, and bear witness all git related parameters every bit shown below.
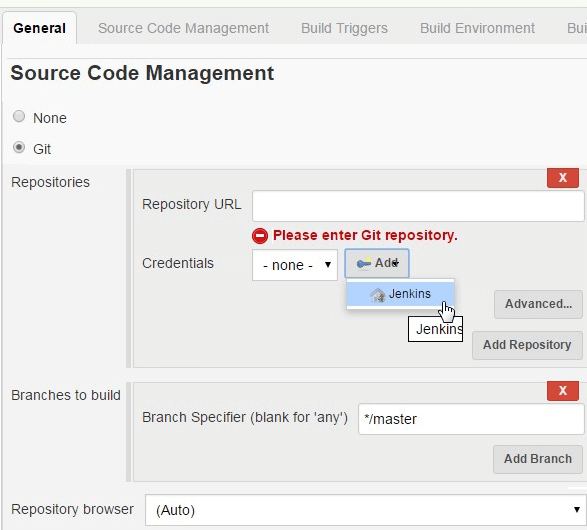
Nether the Git section, in the Repositories department, you'll see the following:
Repository URL: This volition be the URL of your remote repository. The syntax is same equally what yous'll specify in the git command line. For instance: username@git-server-ip:/git/repository/full/path
The following are some possible syntax for the repository URL:
- ssh://git@github.com/github/git.git
- git@github.com:github/git.git
- ssh://user@other.host.com/~/repos/R.git
- https://github.com/github/git.git
- git://github.com/github/git.git
Credentials: By default, this will be "None". There will an "Add together" button next to information technology. From here, you can specify the credentials that are required for the Git URL specified above.
Advanced push button: When yous click on the "Advanced" button, you'll see two more than text boxes. For almost cases, you don't need to enter annihilation here.
- Name – You tin leave this empty, and Jenkins volition automatically generate unique name. This "name" is exactly the same equally the one used in the git remote command.
- Refspec – The default refspec is "+refs/heads/*:refs/remotes/REPOSITORYNAME/*". This is Ok for nearly of yous, and you tin leave this empty. By default will exist retrieve all the branch heads as remotes/repositoryname/branchname. Instead, if you ever want to retrive just 1 branch, you may want to modify this.
Add together repository button: Click on "Add together repository" to create this as the default git repository to exist used by this detail Jenkins Job.
Branches to build section: In this department nether "Co-operative Specifier (blank for 'whatever'):", the default value is */principal. For most cases, yous tin leave this to default. This volition rails but the master branch. Merely, if you go out this bare, all branches will exist examined for changes and built. The syntax for this field is: refs/heads/
The following are various possible examples for the "Branch Specifier" field:
- refs/heads//origin/master
- remotes/origin/master
- refs/remotes/origin/master
- tag-proper name
- refs/tags/tag-name
- commit-id
- ${ENV_VARIABLE}
- ${TREEISH}
- refs/tags/${TAGNAME},…
- Wildcards: east,g: *, **
- :regular-expression
Add Co-operative button: Click on this button to add the branch specified in the above "Branch Specifier" field to be used.
Repository browser: By default, this drib down list volition be set to "Auto". In most cases, y'all tin can only leave it to default. This will create the links for the "changes" view inside the Jenkins to an external system for browsing. The "Motorcar" option will automatically choose the best possible repository browser for the selected SCM.
The following are possible values for this Repository browser:
- Auto
- AssemblaWeb
- FishEye
- Kiln
- Microsoft Squad Foundation Server/Visual Studio Squad Services
- bitbucketweb
- cgit
- gitblit
- githubweb
- gitiles
- gitlab
- gitlist
- gitoriousweb
- gitweb
- phabricator
- redmineweb
- rhodecode
- stash
- viewgit
When yous create a new Jenkins job, make certain the security is enabled on that item job as explained here: How to Setup User Security on Jenkins with Project Matrix Authorization
Setup Jenkins Credentials for Git
When y'all create the repository, you might go the following error:
Repository URL error one: ramesh@192.168.101.2:/home/git/devapp Failed to connect to repository : Control "git ls-remote -h ramesh@192.168.101.2:/home/git/devapp Head" returned status lawmaking 128: stdout: stderr: Host central verification failed. fatal: The remote end hung up unexpectedly
Typically, you'll become the above mistake message, when your "Credentials" under "Git" is set up to "None".
To add a credential, click on "Add" side by side to "Credentials" -> Select "Jenkins Credential Provider", this will display the following add credentials screen.
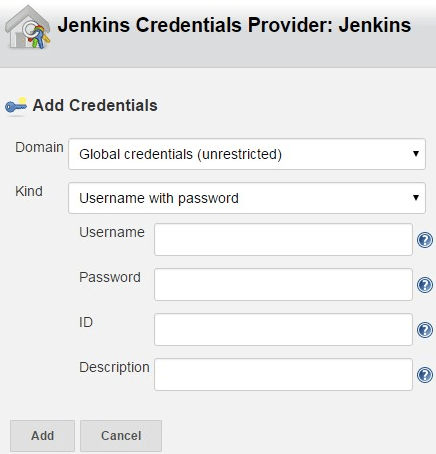
- Domain: By default "Global credentials (unrestricted)" is selected. Other selection is: "Username and password". Employ default.
- Kind: The following are the possible options:
- Username and password (This is shown in the in a higher place screenshot).
- SSH Username with private key
- Secret file
- Secret text
- Certificate
- Username – Specify the username that will exist used to connect to the remote git repository
- Countersign – Specify the password for the above username.
- ID – Exit this empty. This is an internal unique ID that are used to identify this credentials in the job. When y'all leave this empty, Jenkins will auto generate an id.
- Clarification – Descriptive notes about this credentials
If y'all choose, the SSH username with private key, you'll see the following screen:
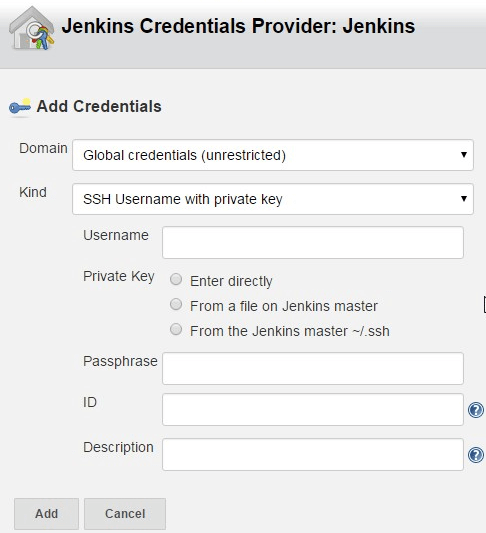
- Kind: SSH Username with Private Key
- Username – Specify the username that will be used to connect to the remote git repository
- Private Key: The following are three options for this:
- Enter straight
- From a file on Jenkins principal
- From the jenkins master ~/.ssh
- Passphrase – The passphrase for your primal
- ID – The unique ID (aforementioned as what is explained above)
- Description – Notes
In one case the credentials are created, complete the remaining sections in the "Git" section under the "Source Code Direction" tab for your detail job.
After this, if you want to view all the credentials that you lot've created then far in Jenkins, become to "Jenkins" -> Click on "Credentials" on the card, which will list all the credentials that y'all've created inside Jenkins so far as shown below.
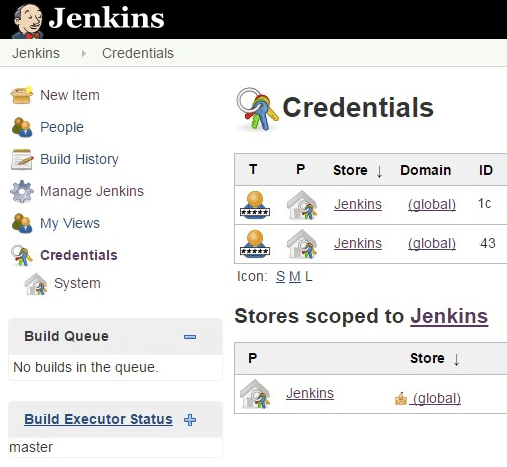
So far we've created a new Jenkins job and associated it to a specific git repository, and specified which co-operative from the repository to be used when this detail job is executed.

Source: https://www.thegeekstuff.com/2016/10/jenkins-git-setup/
Posted by: tanexpon1976.blogspot.com
0 Response to "How To Install Bitbucket Plugin In Jenkins"
Post a Comment