

Can A Air Compressor Tank Be Repaired
Hey! This site is reader-supported and we earn commissions if you buy products from retailers after clicking on a link from our site.
Fixing An Air Pressure level Regulator
Fixing an air regulator offers it's ain challenges, for certain. I am very happy to extend from all of united states thanks to Ed Parks for these instructions on fixing an air regulator.
It is very kind of him to take the fourth dimension to put this downwardly and send information technology to me for inclusion on this site. Here are Ed's instructions.
If you're trying to gear up your air compressor, or you're wondering how to fix an air compressor problem that you're having – bank check out my air compressor troubleshooting page for a detailed list of common air compressor issues and links to handy guides on how to solve your air compressor problems!
Of course, you can also e'er outsource your air compressor repair – click here for some air compressor repair shops almost you.
Pace by Step Guide to Fix An Air Pressure Regulator
Step-by-Step Instructions to Repair Air Compressor with a faulty regulator that does not allow acceptable air pressure to come out of air hose.
Steps to gear up an air pressure level regulator on an air compressor:
- Confirm the diagnosis of a broken air force per unit area regulator
- Keep some pressure level in the tank and prepare for disassembly
- Make sure compressor is unplugged
- Release all of the pressure level from the tank
- Remove screws holding cowling / compressor cover
- Lay cover to ane side don't disconnect wires
- Remove air pressure level regulator with wrench
- Remove air compressor regulator knob
- Remove pressure level regulator knob control piston
- Remove piston spring from inside air regultor knob
- Twist air regulator knob to set for reassembly
- Apply lubricant to cylinder walls
- Reassemble the air force per unit area regulator knob
- Unscrew brass tank pressure seal associates
- Clean pressure regulator manifold
- Clean the leap and rubber seat
- Grind the rubber seat
- Review the safety seat
- Reassemble safety seat, spring and contumely tank pressure seal assembly
- Reassemble and tighten the brass associates into manifold
- Reassemble regulator control knob assembly
- Reassemble plastic cover onto compressor
1 – Ostend the diagnosis of a cleaved air pressure level regulator.
When the air compressor tank has plenty of air just you but get a short burst of air pressure (but momentarily) out of air hose and compressor's air hose guess goes to null – the compressor regulator is probable faulty.

2 – Keep some pressure in the tank and fix for disassembly
Be sure tank is non empty and has some pressure in tank. Plow Regulator Control Knob counter-clockwise all the way and release all pressure from air hose connector. The air pressure level in the tank forces the Control Knob'due south plastic piston to movement back into the Control Knob/Regulator's housing thus preventing damage to the plastic piston when disassembling.
3 – Brand sure compressor is unplugged
Safety kickoff! Brand sure you unplug the compressor, as we're going to be dealing with some exposed wiring.
4 – Release all of the pressure from the tank
Now release all air force per unit area from tank using the water drain valve on bottom of tank.
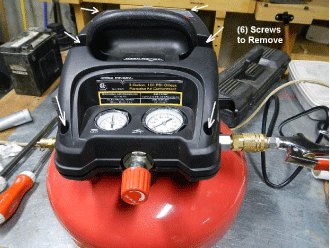
five – Remove screws holding cowling / compressor encompass
5Remove (six) screws property top half of plastic compressor cover on: (2) from handle and (1) at each corner of plastic housing cover. The (2) screws in the handle are Motorcar Screws 10-32 ten ane″ Phillips and nigh likely volition strip when reassembled – replace with 10-32 ten 1 1/4″ Phillips.

6 – Lay cover to one side don't disconnect wires
Lay summit half of plastic cover over to side – no demand to disconnect any wires.
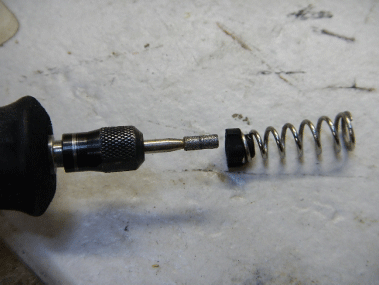
7 – Remove air pressure regulator with wrench
Remove air pressure regulator by using Crescent Wrench and turning hex nut counter-clockwise. Will be tight just be gentle and then every bit not to harm o-band seal. At that place will be only plenty room to get wrench on at an angle with bottom plastic housing nonetheless in identify when the Control Knob is completely screwed out.

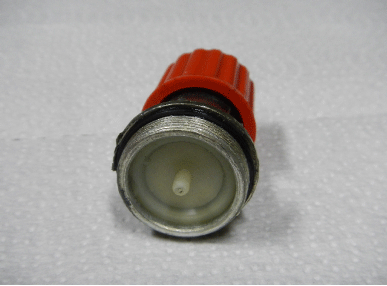
8 – Remove air compressor regulator knob
Regulator Control Knob removed.
9 – Remove pressure regulator knob control piston
Plough the red Control Knob clockwise and the plastic piston with mail service in the eye (in higher up picture v) will exist pushed out.
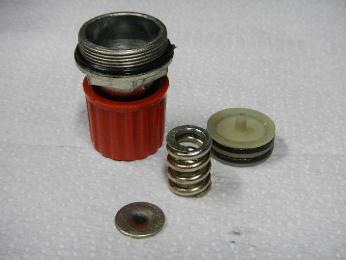
10 – Remove piston bound from inside air regultor knob
Remove plastic piston, compression spring, and metal disk from Control Knob housing and clean all parts with a paper towel or rag; don't use anything in housing that volition scratch inner wall of cylinder, but clean out any corrosion. Exercise non remove the (2) o-rings from the plastic piston unless y'all program to supersede them.
eleven- Twist air regulator knob to fix for reassembly
Turn cerise Control Knob counter-clockwise again to screw knob out for reassembling.
12 – Utilise lubricant to cylinder walls
Apply a thin moving picture of lubricant (would not recommend grease as it will glue upward with time) – Teflon or Silicon lubricant or o-ring grease to the cylinder walls of the control knob's housing, to the metallic disk, and to the o-rings.
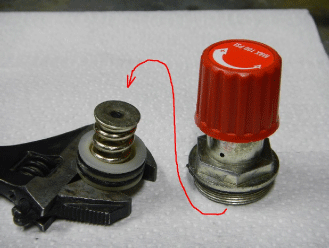
13 – Reassemble the air pressure level regulator knob
Reassemble the above parts. Be sure the metallic deejay's cupped side is facing to the lesser / inside of the Control Knob. Information technology is easier to become these parts reassembled if you hold the parts as pictured below (on the crescent wrench) in your hand and place the Control Knob on height of them pressing them into the Control Knob housing advisedly, not to damage the o-rings. Printing in until completely seated like in moving picture five. Sit down reassembled Control Knob aside until final assembly.
14 – Unscrew brass tank pressure level seal associates
With a large apartment screwdriver unscrew brass tank pressure seal assembly. Do non remove o-band unless you plan on replacing information technology.

15 – Make clean pressure regulator manifold
Clean within of manifold with a newspaper towel or rag.

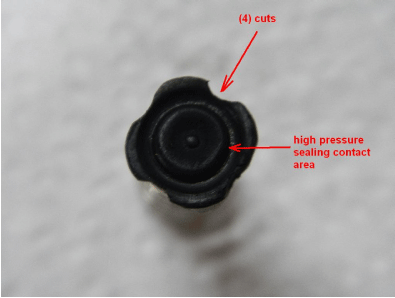
16 – Make clean the spring and condom seat
The part causing the problem is the rubber Tank Pressure level Seat. Carefully remove the bound with information technology'south prophylactic seat, clean both parts. What has happened, due to the type of material, from pressure level and moisture the condom has swelled to the extent that an acceptable amount of air cannot laissez passer effectually the sides of the rubber seat. No need to remove the rubber seat from the compression spring.

17 – Grind the rubber seat
Using a Dremel with a 1/8″ round carbide scrap advisedly grind a notch into the (4) sides (the heart of the sides only, not the corners) of the prophylactic seat. BE VERY CAREFUL Non TO GRIND TO DEEP.
Upon close inspection of the sealing surface of the safety seat you'll discover a circular groove that makes contact with the sealing / mating surface inside of the brass threaded hex bushing. Be sure to not grind any where close to this sealing groove in the condom or your tank will no longer agree pressure level when stored. Exercise Not Grind on the corners at all; the corners keep the rubber seat in identify and aligned in the brass hex bushing.
18 – Review the condom seat
Notice depth of the notches is just enough to create a gap for air to come effectually the rubber when it is reassembled in the brass threaded hex bushing.
xix – Reassemble rubber seat, leap and brass tank pressure seal assembly
Utilize a very thin motion-picture show of Teflon or Silicon lube or o-ring grease to the rubber and reassembly into brass threaded hex bushing.

20 – Reassemble and tighten the brass assembly into manifold
Use a light coating of lubricant to the o-band and screw brass assembly into manifold. Only tighten snugly – no demand to overly tighten o-band seals -, just good and snug (to tight will cutting o-band).
21 – Reassemble regulator control knob assembly
Employ a blanket of lubricant to the Regulator Command Knob assembly's o-ring and likewise to it'due south mating surface of the manifold. This o-ring will be fairly easy to cut if not conscientious. Reassemble Regulator Control Knob assembly into manifold, again tighten snugly, but don't over do.
22 – Reassemble plastic comprehend onto compressor
Reassemble peak half of plastic cover to compressor.
This gear up volition now allow an adequate corporeality of air to pass around the safety seat that had swelled over time.
If someone can locate a part number and a source for a new safe seat please post it on the parts needed page, and refer to this page too, if you would.
Dave comments
Thank you and so much for your repair instructions virtually how to fix a regulator on the page https://www.about-air-compressors.com/fixing-an-air-regulator. Now my Key Pneumatic 3-gallon pancake air compressor, model 95275, from Harbor Freight is working again. Yippee! I didn't take the proper lubricant, so all I did was detach it, and used my Dremel to shave off bits of the prophylactic Tank Pressure Seat, as you lot showed. I wasn't sure what you meant about the "corners", since information technology was perfectly round, but I only shaved off a little from the four points of a cross, reassembled it, and now it releases air again. Before, it would just do i brief puff of air, then the regulator pressure level approximate would lesser out at zero, and have no more than pressure, even though the tank was fully pressurized.
Note added: I didn't accept a screwdriver big enough to remove the Tank Pressure Seal, but a socket wrench worked very well. Putting it together, I only needed to push downwards on the head of the Tank Pressure level Seal to compress the spring and beginning threading information technology in a niggling past hand, and and so I could employ the socket wrench to tighten it the residue of the fashion.
Fixed now, thanks to you lot! You lot have a very informative site, and I greatly appreciate your piece of work.
_______________________________
Response: Well Dave, the originator of these instructions was Ed Parks, and we would very much like to send him your annotate but have no manner of reaching him. I hope he reads your kind words. Cheers!
Ask a question about Fixing an Air Regulator ? Please add your comment hither forth with photos to assistance others help you with your compressor and equipment problem!

Can A Air Compressor Tank Be Repaired,
Source: https://www.about-air-compressors.com/fixing-an-air-regulator/
Posted by: tanexpon1976.blogspot.com
0 Response to "Can A Air Compressor Tank Be Repaired"
Post a Comment